Inspirational Tutorial: Create a cosy lap quilt!
- Read time: 7 minutes
- Written by: CraftersCompanion
There’s nothing nicer than sitting in a comfy chair with a fancy quilt on your lap or across your knees in the winter all nice and cosy. Or in summer sitting in the garden with a cool drink on your own little piece of softness! A quit is so versatile! Imagine making it from materials that have memories attached to them, what a talking piece it would be! Designer Marie shows you how you can make a gorgeous lap quilt in her tutorial here, let’s begin!

Directions:
Step 1: Cut all the fabrics for the top into 1.5” strips using a rotary cutter and a mat.
For this quilt Marie used 5.5” squares finishing at 5” so to make the lap quilt calculate the best way to cut to give you the best number of cut squares; 5 strips sewn together to yield a 5.5” block strip and this is sub cut into 5.5” squares.
19” cut into 1.5” strips = 12 from 1 fat quarter therefore you would get 72 strips from the 6 fat quaters. These are then sewn with 5 strips making a 5.5” x 19” block, this makes 14 blocks and it is then is sub cut into 5.5” squares; you get 3 squares from each block (plus some wastage) and a total of approximately 42 blocks. After sewing the strips together into the 19” x 5.5” block, press the seams in the one direction or open and flat but don’t mix this arrangement as it will cause little bumps in the quilt top.
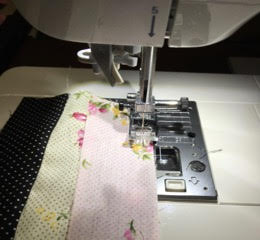
Step 2: These 5.5” blocks are then laid out into a pattern that suits you, or alternatively you can sew them together randomly. All squares are sewn together, again using a quarter inch seam throughout. Once more you need to be careful with accuracy as failing to create quarter inch seams with throw the quilt top off. If all 5.5” blocks are used it will be 7 x 7 blocks, making a 35” square quilt. Marie turned her blocks by 90 degrees to produce a pattern and used only 6 blocks x 6 blocks making a 30” square quilt
Top tip: Make sure that you keep your seams equal at quarter inch otherwise the blocks change size and the ‘points’ won’t match up.
Step 3: When the top is sewn, make sure all seams lie flat. Place your square of wadding on a flat surface and lay the quilt top, face up. Depending on how you intend to baste these layers together, spray glue, pin or tack together join these 2 layers.

At this stage you can commence foundation quilting, this will ensure that the layers stay true and flat. Stitch in the ditch along each of the full length seams and capture the layers, if you sew carefully you shouldn’t even see these rows of stitching.
Top Tip: If you wish, you can do Free Motion Quilting at this stage, with 2 layers in place or you can add the backing layer and quilt through all 3 layers producing stitched patters on both the top and the bottom.
Step 4: To fix the backing, lay the quilt, top side down (Right side down) on a flat surface and lay the backing fabric right side up (Right side up). Again its up to you how to baste these layers together.
Top tip: Free motion quilting can take a bit pf practice and if you have some spare fabric, make a few small quilt sandwiches (2 or 3 layers of fabric) and test your free motion skills before you launch into stitching your lovely lap quilt.
To start free motion quilting, and if your machine supports it, the feed dogs need to be released and dropped and the utility foot changed to the darning foot. Free motion can produce a pleasant pattern, like leaves, hearts or feathers, or a series of random stitches over the entire quilt top, it is drawing with your needle and thread.
The amount of quilting and the pattern is entirely up to you. When complete, I like to give the quilt a very light and gentle press to settle these layers.
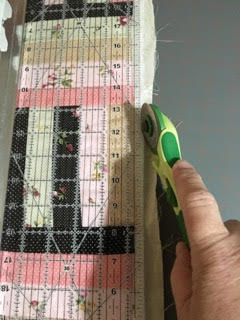
Step 5: Regardless of how carefully you sew the three layers together, you will have some unevenness and this needs to be trimmed to square it up before the binding is fixed. Lay your quilt out and trim the outer edges of all four sides, make sure you keep the outer blocks the same size and otherwise it will be noticeable.
Step 6: To bind your quilt, prepare the binding fabric by pressing and straightening the edges. Cut 2.5” strips of sufficient length to go right around the four sides of quilt, taking account of corners and an overlap to finish it off.
Press the ‘joins’ open and then fold in half wrong sides facing and press well along the fold. Pin or clip the binding to the top side of the quilt at the outer edge. Place the quilt under your presser foot and keeping the quilt as flat as possible, sew a quarter inch seam around the edges. At the end of each length, stop a quarter inch back and sew of at a 45 degree angle.
Recommence the sewing of the next side at 45 degree and recommend the straight sewing until all edges are completed. Remove from machine, flip the quilt binding over and clip or pin it to the back. You will notice that the beautiful mitred corners that you achieved on the front, come together beautifully at the back of the quilt. The binding can then be finished by hand sewing the whole way around, or you can machine stitch, if you are doing this.
Top Tip: Sew from the front to ensure its neat but ensure you check that the back of the binding is caught and that there are no wrinkles or twists.
Press the binding flat and enjoy.
Here is a list of supplies Marie used on her project.
Crafter’s Companion supplies:
6 x Fat Quarters of your choice
Other supplies: Matching threads for quilting and sewing and a Air erasable pen / quilting pencil, 1 Metre Seeded Cotton Fabric
Top tip: Use 1/4” seams throughout your project!
We would love to see what you make! Share your projects and cards with us on our Facebook page, tag us onInstagram (#crafterscompanion), on Pinterest (@CraftersCompUK) or on Twitter (@CraftersCompUK)!